Daisy Chaining Multiple Boards
Up to 32 boards can be daisy-chained together over the high-speed serial bus. Under this configuration, one board acts as a Master node and the remaining are Slave nodes. The master node can then send commands to the slaves and the slaves can send back state information and command acknowledgments. Slave-to-slave communication is not available. One and only one Master node should be configured per daisy chain network. If the daisy-chain network is broken, all nodes on the network loose their connection.
Each slave node is addressed by its index offset to the Master node. The master node is referred to as Target 0 and slave nodes start at Target 1 … to Target N.
One advantage of a daisy-chain configuration is that the Master node can be the sole Wi-Fi network interface to a number of stepper motors. Applications only need to manage one network connection to the Master. Adding an additional axis to your robot/device is easy and only requires wiring up another slave node.
Wiring
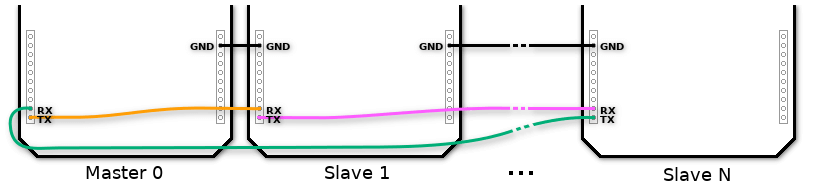
The wiring for a daisy chain network is as follows:
- From the Master node, connect Master0.TX → Slave1.RX
- From the first Slave node, connect Slave1.TX → Slave2.RX
- Repeat 2. for all slave nodes. Reference figure above.
- From the last Slave N node, connect SlaveN.TX → Master0.RX completing the daisy chain
- All electrical grounds must be connected together.
By default, all Wi-Fi Steppers are configured to be Slave nodes for convenience. (There is no overhead added to a disconnected daisy chain network.) The Master node needs to be configured on the settings page.
Note: When daisy-chaining is enabled, the Turn off slave wifi configuration settings will disable all Slave Wi-Fi controllers so the Master node is the only one accessible over Wi-Fi.
Interfaces
Most interfaces allow for issuing commands over the daisy chain network. At this time, MQTT is the only interface that does not support this.
The following are examples of issuing commands to the Master 0 node but targeting Slave 2 node (the third motor). The commands will be received by the Master node and re-issued over the high-speed serial network.
Python Example
# Python code

import goodrobotics as gr

# Create and connect to motor using wifi over low-level interface
MOTOR = gr.WifiStepper(host='wsx100.local')
MOTOR.connect()

# Target motor 2 on daisy-chain (3rd motor on daisy-chain network including master)
TARGET = 2

# Issue run command (set speed to rpm)
rpm = gr.RPM()
stepss = rpm(30) # Motor takes steps per second, use RPM to stepss helper
MOTOR.run(dir=MOTOR.FORWARD, stepss=stepss, target=TARGET)

# Issue command that waits 5 seconds, then issue command that shuts motor down
MOTOR.waitms(5000, target=TARGET)
MOTOR.stop(hiz=true, soft=TRUE, target=TARGET)

# The above code will
#  - Connect to Master 'wsx100' on network (using mdns hostname lookup)
#  - Issue 30 RPM spin command on 3rd motor in daisy-chain network
#  - Issue 5 second wait on same motor
#  - Stop the motor
# The result will be 3 commands added to the execution command queue (Queue 0)
# on the 3rd motor of the daisy-chain network. The commands will spin
# the motor at 30 RPM for 5 seconds and then shut it off
RESTful Example
# Shell/Bash code

# Host of Master node on wifi network (using mdns hostname lookup)
HOST="wsx100.local"

# Target motor 2 on daisy-chain (3rd motor on daisy-chain network including master)
TARGET="2"

# Issue motor spin at 30 RPM (assuming 200 steps per revolution typical for stepper motors)
STEPS_PER_SEC="100"  # 30 RPM / 60 * 200
DIRECTION="forward"
curl -sS "http://${HOST}/api/motor/run?stepss=${STEPS_PER_SEC}&dir=${DIRECTION}&target=${TARGET}"

# Issue a wait for 5 seconds
WAIT_MS="5000"
curl -sS "http://${HOST}/api/motor/wait/ms?ms=${WAIT_MS}&target=${TARGET}"

# Issue a stop motor command
HIZ="true"
SOFT="true"
curl -sS "http://${HOST}/api/motor/stop?hiz=${HIZ}&soft=${SOFT}&target=${TARGET}"

# The above 3 commands are added to the execution command queue (Queue 0)
# on the 3rd motor of the daisy-chain network.